
The real tutorial for Galileo Gen 2 Board
2016-12-09[ Intel hardware embedded linux tutorial galileo ]
Some of the tutorials on the internet are outdated, and cause a lot of problems to start on the develop of the Galileo Gen 2 Board, to solve this, we will explain what you'll need to do to make the best setup possible.
-
Test tour board. Make a simple test, take a FTDI cable.
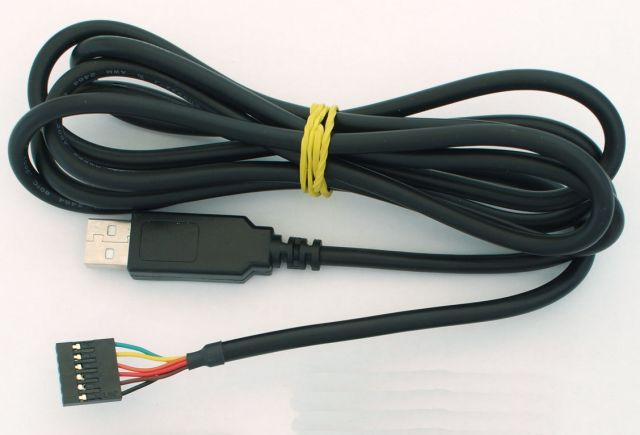
Put the black cable (the one that have an arrow on it) on the GND.
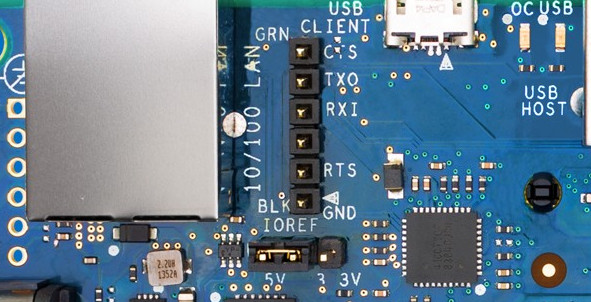
The board come with a jumper to select the logic level of the FTDI (5V or 3.3V). After that, we can access the terminal of the inboard Linux. Plug the FTDI in your computer.
$ dmesg
With this command you will see the name of the USB adapter.

As we can see, the name of the USB adapter is ttyUSB0. Now we can connect with the board and read the feedback of the boot.
$ screen /dev/ttyUSB0 115200
Turn on your board and wait, you will see the boot options and the log.
-
Upgrade your firmware. Download the program to update the firmware of the board. Website :Intel Links. Windows software : IntelGalileoFirmwareUpdater-1.0.4-Windows OS Independent : IntelGalileoFirmwareUpdater-1.0.4 The Windows 10 and the Linux OS already have the drivers for Galileo and Edison.
-
Download the last image to your SD card. The last image can be downloaded with this link. Format the SD card with fat32 (you can do this with gparted). Unzip the file and put the image inside of the SD card, you can do this with the dd command.
$ dd if=image of=/dev/sdx bs=8
If the board did not boot the SD card try another card.
-
Update the repository. Use the command
$ opkg updateto update your the repository, if the command did not return no nothing, you will need to set the repository by hand, like done in the this pots. But use the new repository ! You can see the new one here.